Miscellaneous
Disaster
Readiness Information
Updated 02oct22
Power outages, fires, floods,
earthquakes, storms and pandemics can interrupt utilities, phones,
stores,
ATMs, and travel. You can be forced to leave your home because of
flooding, sewage backflow, fire, chemical accident, or terrorist
threat. These things occur when you are least prepared.
The large disaster relief
organizations can provide basic relief for a lot of people, but need a
few days to get set up. Wise people are prepared to handle problems on
their own for 3 days to a week.
Do not buy any survival kits or
anything you are not familiar with. After the power goes out is not the
time to try something out. Do not waste your money buying "special
survival food". It will probably get old before you need it. Just keep
your regular canned goods stocked.
Notice
Copyright 2005-2022 Ken Young (http://www.DinoDudes.com).
All
rights reserved.
This document may be freely redistributed for
educational purposes at no charge in unaltered form.
This information is for educational purposes only.
There is no guarantee of any kind that it is accurate, or that no harm
will come to anyone who uses it.
This information is provided on an "as is" basis with
absolutely no warranty or guarantee. The information is not necessarily
correct, complete, or suitable for any particular use. The entire risk
is with you. Should harm arise from using this information, you assume
responsibility for all damages and injuries. In no event shall the
copyright holder, or any other party, be liable for compensation or
damages arising from the use, misuse, failure to use, or inability to
use this information.
Hand
sanitizer recipe
- 2/3 cup of
90% rubbing alcohol
- 1/3 cup aloe
vera gel
- 5-10 drops
of nice smelling essential oil (optional)
- Mixing bowl
- Spoon
- Funnel
- Empty liquid
soap or hand-sanitizer containers
Mix everything and put it in the
bottles
Making
your own masks
There are plenty of patterns on the
Internet for sewing your own face masks. But what kind of cloth to
use? Any cloth used to make filters works well, but a
microfiber cleaning cloth is better.
Earthquake
latches
for cabinets
Earthquakes larger than magnitude
4 can hit any place on the planet (they are more frequent some places
than others). They are unkind to upper cabinets, causing them to
disgorge their contents onto the floor causing a colossal mess. Your
appliances and ceramic dishes will need to be replaced.
Earthquake latches for cabinets
with double doors are a challenge. The doors pull forward and apart at
the same time as they open.
There are many solutions
advertised, but all come up wanting. We needed something that wasn't
plastic, inconvenient, or unreliable. No advertised earthquake latch
was adequate.
Working with a seismologist who
worked with the USGS, we found a solution we liked. Marine cabinet
latches are strong and reliable. "Barrel bolt" cabinet latches proved
to be convenient, also. Operating it when opening and closing the
cabinet isn't a hassle.
Most marine barrel bolts would
work fine as latches for cabinets with double doors. The ones we bought
were made by Suncor
Stainless and sold to us over the Internet by West
Marine.
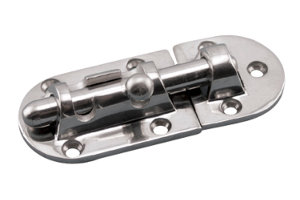
We bought these "barrel bolts"
for use as cabinet latches.
|
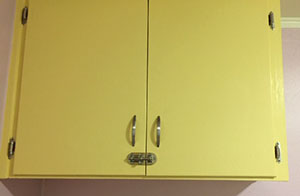
Here it is installed on one of
our cabinets
|
Sand
filtration
system for making
creek water (mostly) safe to drink
- Start with a clean 10 gallon
bucket
- Punch some holes through the
bottom
- Make drip-guides: hang a string
from each hole (run between holes and tie) so the clean water will drip
straight down
- Make spill catchers: Tie rags
together and wrap around the bucket several times to stop contaminated
water from
running down the outside and dripping into the clean water
- Hang it waist high from a rope
- Put a 1/2" layer of gravel on the bottom for better drainage
- Line the bottom with a towel to keep grit out of the clean water
- Fill with 18" or 500cm of clean
sand (better still, mix in some crushed charcoal, crushed chalk,
powdered pumice, zeolite, or diatomaceous
earth)
- Top the sand with gravel, and top the gravel with small rocks.
This is so the sand isn't disturbed when you pour water in.
- Put a collection bucket
underneath
- Pour water in carefully until
it comes out clear (don't spill any). Put a few teaspoons of bleach in
the first bucket to sterilize the sand if you can. You may need more
than one such bucket to prime it. Keep putting the same water back in
until it comes out clear.
- Once it starts coming out clear
it is probably drinkable. Let the bleach work for 15 minutes, and its
ready to use.
- Use separate buckets for clean and dirty water. Mark them so they
don't get mixed up.
- Slowly pour in one bucket of water at a time. Let the water drip
into the clean bucket.
- For best results, put 1/2
teaspoon of bleach in each gallon of water you pour in. Let the clean
water sit for 15 minutes so the bleach can do its job.
- Put
more rocks on top if the sand moves around
- Remember that anything that
runs down the outside of the bucket will wind up in the drinking water
There are ready-made commercial
bucket
filters. One example is the AquaPail (This is not an endorsement of
that
product).
A
clever water
distillation system
If you have a working stove, but no
clean water, you can distill using a big pot. Fill the pot halfway with
dirty water. Put the lid on upside down, so the handle points down. Tie
a cup to the handle. Start simmering.
The steam condenses on the
upside-down lid and runs downhill to the handle. From there it drips
into the cup.
Do not let dirty water get on the
outside of the cup or it will contaminate the clean water when you pour
it out.
Alternative setup: Put a brick in the
pot and set the cup on the brick. This is a lot easier but isn't as
good because the brick displaces a lot of water, reducing your still's
capacity.
Sterilizing
water
without boiling it
Get some clear plastic bottles.
Peel the labels off.
Fill with clear water.
Lay the bottles on their side in the
sun all day.
The heat and UV radiation will do a
reasonable job killing most of the dangerous stuff in the water.
Improvised
cooler
Put a medium sized flower pot inside
a big one with sand in between. Keep it covered and in a cool shady
place. Pour water into the sand every day. The inside will be cooler
than air temperature.
Hayboxes
(ice
chest cookers)
Conserve fuel with an ice-chest
cooker (called a haybox). Line an ice chest or other insulated
container with aluminum foil to make one.
Bring a pot of rice, beans, soup or
stew to a full boil. Put the lid on and put it in the haybox (ice-chest
cooker) for twice as long as it would take to cook on the stove. Ta-da!
- Don't put fire into the haybox, just the boiling pot
- This is basically a crock-pot
- Embedding the pot in a pile of towels or dirty laundry works, too.
Hobo
stoves
These simple stoves cook one pot with
a small amount of fuel (sticks or charcoal)
Take a big can. Use a can opener to
remove the top completely. Use a church-key can opener to punch some
holes in one side of the can near the bottom. More holes on the other
side near the top.
Position the can so the side with the
holes on the bottom is on the upwind side. Fill with sticks or
charcoal. Light it using little pieces of paper. Once it gets going you
can put a pot on top and cook.
If you don't expect any wind, punch
holes all around both the top and the bottom.
The
Crayon Candle
Crayons make a 30-minute candle. Use
a blob of the melted wax to glue it to a plate for safety. The paper
makes a wick, so you just light it. Warning:
This may be irresistible to children, who
might burn the place down.They may also want to recreate it later, adding
subsequent fire risk.
The
Crisco Candle
You can make an everlasting candle
out of lard. Roll up a sheet of paper to make a big wick, and stick it
into a can of lard. Warning: This may be irresistible to children, who
might burn the place down.
Moser
Lamp /
Bottle Light
This is a light for a temporary
shelter. Put two teaspoons of bleach in a bottle and fill it with water
(the bleach keeps the fuzz out). Cap it and push it halfway through a
hole in the roof (cap-side-up). Seal around the bottle to keep the rain
out. It glows like a 50W bulb when the sun hits it.
LED lights and your UPS
UPS = Uninterruptible Power Source.
They are used to protect your electronics from power problems and give
you time to save your data after the power fails.
You can plug a lamp with an LED
bulb into a UPS after a power failure and get light for quite
some time. How long depends on the bulb and the UPS. Most UPS models
chirp or beep in this situation because they think they are powering a
computer and want you to turn it off before the UPS runs out of juice.
Consider plugging an LED nightlight
into your UPS. It will give you a little light in the room when the
power fails. You may need a power strip or short extension cord for
better nightlight positioning.
Opening
a
can without a
can opener
You can open a can without any tools.
Put it upside down over flat concrete and scrub back and forth to grind
the crimp off. After a minute of vigorous work, you squeeze the can
really hard and the lid will pop out.
A
clever mosquito trap
Turn a 2 liter soda bottle into a
mosquito trap. It won't get all the mosquitoes, but it will keep their
numbers down.
- The trap: Start with an
empty 2 liter plastic bottle. Cut the top part off, flip it over so it
works like a funnel, and attach with glue & tape. Now you have a 2
liter jar with a funnel-top.
- Bait solution: Boil a cup
of water, add a little sugar, and cool completely. Then add yeast
(brewers yeast is good). The sugar-water must be cooled completely or
the yeast will die.
- Deploy: Add the yeast and
put the bottles around where you will be.
- How it works: The yeast
digests the sugar, producing carbon dioxide. Mosquitoes home in on the
carbon dioxide in your breath, and so enter the trap to see if you are
in there.
Mosquitos go in but they (mostly)
don't come out. It lasts a couple weeks.